[HACK] Ubuntu Server booting to not wait for 120 seconds for unconnected network interface

While setting up a new network server for my volunteer work, the server with 1+4 ethernet port machine waits for network up and running. This is very annoying.
All I want is to make this timeout shorter. After sniffing around, I spotted the thing that waits.
/lib/systemd/system/systemd-networkd-wait-online.service has

[Service]
Type=oneshot
ExecStart=/lib/systemd/systemd-networkd-wait-online -q --timeout=10
RemainAfterExit=yes

Add -q and --timeout=10. It still waits but only 10 seconds, not 120.
Do sudo systemctl daemon-reload which I think not needed, but does no harm either, and reboot.

PROFIT!

Ubuntu – enabling USB wakeup

First, you need a command to set “enabled” to the USB ports.

Quick hack of shell script. Let’s call this /usr/local/bin/usb-standby-power-on.sh.

#!/bin/bash

for usbport in /sys/bus/usb/devices/usb*/power/wakeup ; do
    echo enabled > $usbport
done
exit 0

Then, you need a systemd unit file. Name this /etc/systemd/system/usb-wakeup-enable.service.

[Unit]
Description=Enable USB's stand-by power

[Service]
Type=oneshot
ExecStart=/usr/local/bin/usb-stanby-power-on.sh
User=root
Group=root
RemainAfterExit=true  # Indicates that the service remains active after the main process exits

[Install]
WantedBy=basic.target

Then,

sudo systemctl daemon-reload 
sudo systemctl enable usb-wakeup-enable.service
sudo systemctl start usb-wakeup-enable.service

Ubuntu Discord generates a lot of logging – : apparmor=”DENIED” operation=”ptrace” class=”ptrace” profile=”snap.discord.discord”

https://forum.snapcraft.io/t/discord-ptrace-apparmor-denials/5099/13

If you see Discord generating the logging

: apparmor="DENIED" operation="ptrace" class="ptrace" profile="snap.discord.discord"

Ues following command supresses it. See the first line link.

snap connect discord:system-observe :system-observe
snap connect discord:unity7 :unity7

Ubuntu 22.04LTS USB Audio trouble with PulseAudio and PipeWire

I started using a Ubuntu Studio which uses KDE as a daily machine. It has a pleasant UI and am liking it. However, the audio become a MAJOR issue with Zoom meeting.
I have a M-Audio USB interface. PulseAudio pactl lists the interface as “a card”. So it should be working but it is not showing up in the UI. I tried various trouble shooting.

A thing worked

systemctl --user restart pipewire
systemctl --user enable pipewire-pulse --now

This is after seeing this error message in the syslog.

Sep 21 10:02:27 ubuntu pipewire[171138]: spa.alsa: 'front:1': capture open failed: Device or resource busy
Sep 21 10:02:27 ubuntu pipewire[171138]: mod.adapter: 0x56032a66fce0: can't get format: Device or resource busy
Sep 21 10:02:27 ubuntu pipewire-media-session[171140]: ms.core: error id:72 seq:291 res:-16 (Device or resource busy): can't create node: Device or resource busy
Sep 21 10:02:27 ubuntu pipewire[171138]: spa.alsa: 'front:1': playback open failed: Device or resource busy
Sep 21 10:02:27 ubuntu pipewire-media-session[171140]: ms.core: error id:78 seq:298 res:-16 (Device or resource busy): enum params id:3 (Spa:Enum:ParamId:EnumFormat) failed

I do not fully understand why it is failing to acquire the device but restarting a user daemon can take care of it, it is a progress.

Things not quite well worked – 1

pacmd unload-module module-udev-detect && pacmd load-module module-udev-detect

So, this re-discover USB audios but it really messes up the other audio devices. On-board audio becomes duped entries in the control panel, and disrupts on-board audio I/O.

Things not quite well worked – 2

systemctl --user restart pulseaudio

This flushed out the dupes but the USB audio is not listed.

Things not working now

On-board HD audio is supporsed to drive HDMI audio out but it is not working. pactl list shows the HDMI output in its profile so it SHOULD show up but does not.

Card #40
    Name: alsa_card.pci-0000_00_1f.3
    Driver: alsa
    Owner Module: n/a
    Properties:
        device.enum.api = "udev"
        device.api = "alsa"
        media.class = "Audio/Device"
        api.alsa.path = "hw:0"
        api.alsa.card = "0"
        api.alsa.card.name = "HDA Intel PCH"
    ...
    Profiles:
    ...
        output:hdmi-stereo+input:analog-stereo: Digital Stereo (HDMI) Output + Analog Stereo Input (sinks: 1, sources: 1, priority: 5965, available: no)
TIL Overlayroot exists, and I wasted my time

With moving onto Ubuntu 22.04LTS, WCE triage needed to not use aufs anymore. Aufs is a union file system and it is around quite sometime, but apparently deprecated from 22.04.
I wrote a rather annoying script to do the file system overlay for 18.04, and continued to use it in 20.04. Here is the script.
So learning that aufs not available anymore, I was ready to rewrite it with overlayfs. After poking around with a lot of googling and reading man pages, I ran into overlayroot package.
I did not know I was solving a problem that I did not need to solve. It is already solved and all I have to do was to install this package and use it. Reading it, lt looks like it has been around quite sometime.
Sometimes, instead of solving the problem, the best way is to ask the right (google) question. Damn. I spent too much time on this.

Ubuntu 22.04, NVidia and Intel hybrid graphics with multiple display problem and how to make it work

For WCE work, I used to use a Dell Latitude E7340 donated to WCE. It was not fast machine but it is easy to swap disks, etc. I got a lot of mileage out of it. With WCE getting newer laptops, I decided to replace it with newer one. It is not really new as it is a used donated Lenovo P51 but it is still better. Quad core, NVMe x 2, and 2.5 disk space
I fresh installed a vanilla Ubuntu 22.04 on it. What do you know, the external monitor does not work. This is a deal breaker as most of work I do with it, I work with an 2nd monitor.
So, here is what I have found:
1. Do not connect the external display until all of steps complete
2. In the BIOS, enable “hybrid graphics”. Choosing “discrete graphics” hangs at start up.
3. You must install NVidia proprietary driver
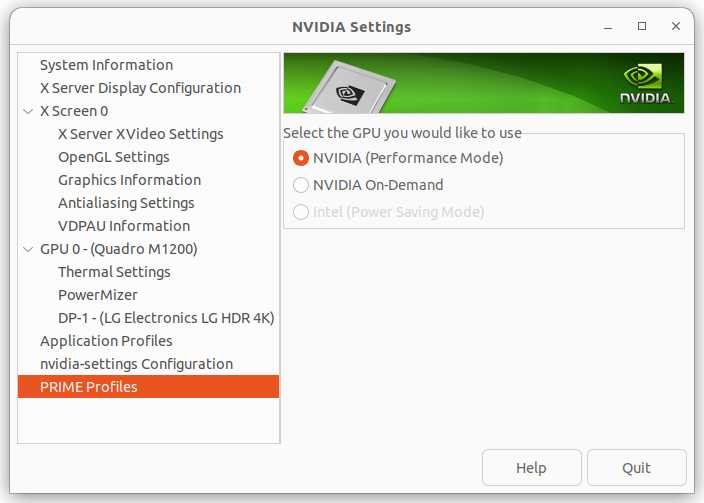
4. Once Ubuntu is up and the laptop is useable, open NVIDIA Settings
5. In it, go to “PRIME Profiles”, and choose NVIDIA (Performance Mode)
6. Reboot the machine
7. Profit!

NVidia native driver settings
It looks like this it not limited to Ubuntu or 22.04. Hybrid graphics and the driver is buggy. When an external monitor is connected, it kills Xorg and hangs the machine. Since this means that the graphics chip consumes more energy, it would be not ideal for laptop use but at home and using this as workstation, this setting gets around the bug. I am writing this on very this laptop with an external monitor.

Intel 4000 HD Graphics with 2560×1440 on HDMI

First, see what’s your monitor connection.

$ xrandr --listmonitors
Monitors: 1
0: +HDMI-2 1920/697x1080/392+0+0  HDMI-2
$ xrandr --newmode "2560x1440" 220.812 2560 2608 2640 2720 1440 1443 1448 1478 -hsync -vsync
$ xrandr --addmode HDMI-2 "2560x1440"

After this you may have to bring up the “Display” control panel and choose newly added 2560×1440 resolution. This will be 55 Hz with reduced blanking

Running Jenkins behind nginx

Jenkins does not use HTTPS. It’s a mistery why it does not. So, in order to run this behind HTTPS, you need a reverse HTTP proxy server in order to add “S” to HTTP.
I spent some time looking for ways to set up HTTPS for Jenkins, and the answer was negative. 🙁
Since you don’t want to expose HTTP over network, make sure Jenkins only answers to the localhost. Then, the nginx must be on the same host, or else there is no point of this exercise.

First, Jenkins is working at jenkins_host:9000 and want https runs on 8000. (I just realized the port number choices are kind of weird.)

Install nginx

This is an easy part – “sudo apt install -y nginx”

Configure nginx

This is a little harder part but here is my current config file.

upstream jenkins_host {
  server localhost:9000 fail_timeout=0; # jenkins_host ip and port
}

server {
  listen 8000 ssl;       # Listen on port 8000 for IPv4 requests with ssl
  server_name     jenkins_host.cleanwinner.com;

  ssl_certificate     /etc/ssl/cleanwinner/jenkins_host-nginx-selfsigned.crt;
  ssl_certificate_key /etc/ssl/cleanwinner/jenkins_host-nginx-selfsigned.key;

  access_log      /var/log/nginx/jenkins/access.log;
  error_log       /var/log/nginx/jenkins/error.log;

  location ^~ /jenkins {
    proxy_pass          http://localhost:9000;
    proxy_read_timeout  30;

    # Fix the "It appears that your reverse proxy set up is broken" error.
    proxy_redirect      http://localhost:9000 $scheme://jenkins_host:8000;
  }

  location / {
    # Don't send any file out
    sendfile off;

    #
    proxy_pass              http://jenkins_host;
    proxy_redirect http:// https://;

    # Required for new HTTP-based CLI
    proxy_http_version 1.1;

    # Don't want any buffering
    proxy_request_buffering off;
    proxy_buffering off;         # Required for HTTP-based CLI to work over SSL

    #this is the maximum upload size
    client_max_body_size       10m;
    client_body_buffer_size    128k;

    proxy_set_header        Host $host:$server_port;
    proxy_set_header        X-Real-IP $remote_addr;
    proxy_set_header        X-Forwarded-For $proxy_add_x_forwarded_for;
    proxy_set_header        X-Forwarded-Proto $scheme;

    # workaround for https://issues.jenkins-ci.org/browse/JENKINS-45651
    add_header 'X-SSH-Endpoint' 'jenkins_host.cleanwinner.com:50022' always;
  }
}

So have this file as /etc/nginx/avaialbe-site/jenkins. You need to a link from /etc/nginx/enabled-site to this file in order for this setting to work. “sudo ln -s ../site-available/jenkins” in /etc/nginx/site-enabled is good.

cert files

As you can see, for SSL, you need a SSL certificate. You can create a self-signed, or get something real. For this exercise, it’s not quite relevant so I’ll leave it to you. I’ll talk about making one with pfSense. Stay tuned.

Memo to myself:

sudo openssl req -x509 -nodes -days 999 -newkey rsa:2048 -keyout /etc/ssl/cleanwinner/jenkins_host-nginx-selfsigned.key -out  /etc/ssl/cleanwinner/jenkins_host-nginx-selfsigned.crt

Jenkins session timeout

On Ubuntu, if you are using Jenkins package, you can change the session timeout in /etc/default/jenkins.

JENKINS_ARGS=" BLA BLA -- --sessionEviction=604800"

I tried –sessionTimeout and it does not work.

Where BLA BLA is the existing args and --sessionEviction=604800 is the new session timeout. The default is 30 minutes and I was timing out a lot while testing Jenkinsfile. Unlke sessionTimeout, sessionEviction’s unit is in seconds not minutes. 604800 is 60*60*24*7 so the timeout is a week.