Framework 16 laptop

Keyboard

As in QMK, copy this to /etc/udev/rules.d/50-qmk.rules.
Then append these lines.

# Framework
SUBSYSTEMS=="usb", ATTRS{idVendor}=="32AC", ATTRS{idProduct}=="0012", TAG+="uaccess"
SUBSYSTEMS=="usb", ATTRS{idVendor}=="32AC", ATTRS{idProduct}=="0013", TAG+="uaccess"
KERNEL=="hidraw*", SUBSYSTEM=="hidraw", ATTRS{idVendor}=="32ac", ATTRS{idProduct}=="0012", MODE="0660", GROUP="users", TAG+="uaccess", TAG+="udev-acl"
KERNEL=="hidraw*", SUBSYSTEM=="hidraw", ATTRS{idVendor}=="32ac", ATTRS{idProduct}=="0013", MODE="0660", GROUP="users", TAG+="uaccess", TAG+="udev-acl"

Then, reload rules, and trigeer the new rule.

sudo udevadm control --reload-rules
sudo udevadm trigger

Now, VIA should work.

xcp-ng + xoa installation

XOA if you wish (optional)

Once xcp-ng is up and running, you’ want XOA up for VM migration. Here is the fastest way.
Log into xen host,
bash -c "$(curl -s http://xoa.io/deploy)"
Answer pretty basic Q and off you go.

If you can run Docker image (Linux, WSL, MacOS (not sure for Apple silicone)), you can run XOA locally to connect to xcp-ng server. This saves the disk/memory on the server.

The default username/password is admin@admin.net / admin.

Cheat sheet

auto start

xe vm-list
xe vm-param-set uuid=$VMUUID other-config:auto_poweron=true

get IP

xe vm-param-get param-name=networks uuid=$VMUUID

PCI passthrough

source

First, make dom-0 to not use the PCI devices.

/opt/xensource/libexec/xen-cmdline --set-dom0 "xen-pciback.hide=(02:00.0)(06:00.0)(06:00.1)"

check what’s the boot command with

cat /boot/efi/EFI/xenserver/grub.cfg

(if this is EFI boot.)

Reboot.

xl pci-assignable-list shows the devices, and use the devices for the guest.

0000:02:00.0
0000:06:00.0
0000:06:00.1

xe vm-param-set uuid=$VMUUID other-config:pci=0/0000:02:00.0,0/0000:06:00.0,0/0000:06:00.1

Reaching to client VNC console

First you need to allow sshd to port forward in /etc/ssh/sshd_config

PermitTunnel yes

systemctl restart sshd

ssh 

Gotchas

When you import a VM from ESXi, the ethernet device name changes. If you are using netplan for static IP address, adjust the device name in /etc/netplan.

Debian/Ubuntu

You may need to install xe-daemon. Without it, the VM status like network IP does not show up.

sudo apt install xe-guest-utilities
systemctl enable xe-daemon
systemctl start xe-daemon

XigmaNAS

pkg install sysutils/xe-guest-utilities xen-guest-tools 

Go over to “System > Advanced > rc.conf” and add ” xenguest_enable” -> “YES”

and service xenguest start. Once it works, you can see the IP address on XOA.

XOA in a docker

This is one of good reasons on my book to go with xcp-ng. I don’t have to run XOA on the server.
Following the instructions on https://github.com/ronivay/xen-orchestra-docker, I make a docker image and running it locally.

Create dirs for the docker:

sudo mkdir -p /var/lib/xen/xo-server /var/lib/xen/redis

then run it.

docker run -dit -p 3380:80 -v /var/lib/xen/xo-server:/var/lib/xo-server -v /var/lib/xen/redis:/var/lib/redis --name xoa --stop-timeout 30 xen-orchestra

I put this in a shell script and run it when I want to run XOA and open the console on localhost:3380.
End of VMware ESXi free version and migration to other hypervisor

Broadcom’s buyout of VMware resulted the end of free version of ESXi.
With it, I have to start moving out my VMs from ESXi to something else. There are a few, and for me
– proxmox
– xcp-ng / xen
– bhyve
Majority seem to like proxmox, and I think I understand why. Pretty nice UI and for small user like me, it should work pretty well, especially Linux only users.
To me, proxmox is “too busy”. I want something simple. ESXi (vSphere?) free was comprehesive and did what I want it to do.
As a FreeBSD usre, bhyve is a possibility. The downside is, there is no good web UI at the moment, so everything needs to be done from command line.
Xen, especially using FreeBSD as dom0 is an interesting option but it would add extra layer of learning.
xcp-ng is a ESXi wanna be but the lingos and UI is lacking. I spent a few hours going through the menus and I am somewhat lost. Feature wise, it does what I want to do.
Well, the 4th option is to go back to bare metal. It’s not like I have too many VMs. (I am running 5 VMs.) and some can be consolidated. Some VMs can be done with docker or VirtualBox as well.
This is truely a PITA situation to undo the VMs. It is likely I have to write down a few posts for the transition.
TBH, at the moment, the front runner is xcp-ng. If I can run XOA in a docker, it would solve the most everything I want to do.

How to set up the SSH keys on Windows

https://superuser.com/questions/1296024/windows-ssh-permissions-for-private-key-are-too-open

TL;DR

New-Variable -Name Key -Value "$env:UserProfile\.ssh\id_rsa"
Icacls $Key /c /t /Inheritance:d
Icacls $Key /c /t /Grant ${env:UserName}:F
TakeOwn /F $Key
Icacls $Key /c /t /Grant:r ${env:UserName}:F
Icacls $Key /c /t /Remove:g Administrator "Authenticated Users" BUILTIN\Administrators BUILTIN Everyone System Users
Icacls $Key
Remove-Variable -Name Key

PowerShell:

  • Set Key File Variable:
    New-Variable -Name Key -Value “$env:UserProfile.ssh\id_rsa”

  • Remove Inheritance:
    Icacls $Key /c /t /Inheritance:d

  • Set Ownership to Owner:

    • Key’s within $env:UserProfile:

      Icacls $Key /c /t /Grant ${env:UserName}:F

    • Key’s outside of $env:UserProfile:

      TakeOwn /F $Key
      Icacls $Key /c /t /Grant:r ${env:UserName}:F

  • Remove All Users, except for Owner:
    Icacls $Key /c /t /Remove:g Administrator “Authenticated Users” BUILTIN\Administrators BUILTIN Everyone System Users

Verify:

Icacls $Key

Remove Variable:

Remove-Variable -Name Key

Ubuntu 22.04, NVidia and Intel hybrid graphics with multiple display problem and how to make it work

For WCE work, I used to use a Dell Latitude E7340 donated to WCE. It was not fast machine but it is easy to swap disks, etc. I got a lot of mileage out of it. With WCE getting newer laptops, I decided to replace it with newer one. It is not really new as it is a used donated Lenovo P51 but it is still better. Quad core, NVMe x 2, and 2.5 disk space
I fresh installed a vanilla Ubuntu 22.04 on it. What do you know, the external monitor does not work. This is a deal breaker as most of work I do with it, I work with an 2nd monitor.
So, here is what I have found:
1. Do not connect the external display until all of steps complete
2. In the BIOS, enable “hybrid graphics”. Choosing “discrete graphics” hangs at start up.
3. You must install NVidia proprietary driver
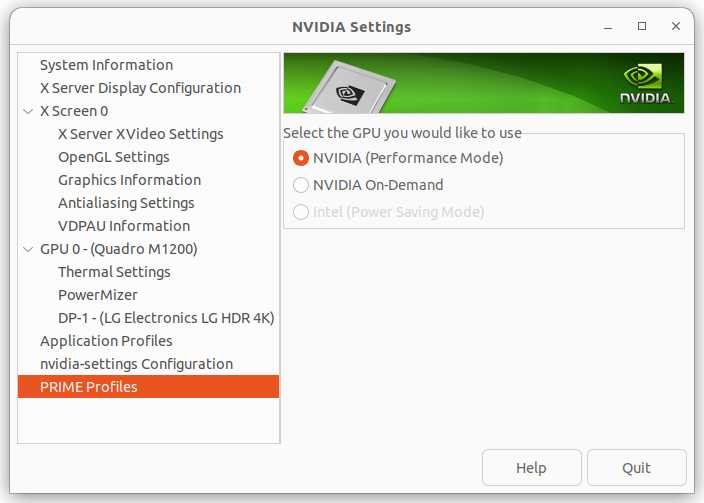
4. Once Ubuntu is up and the laptop is useable, open NVIDIA Settings
5. In it, go to “PRIME Profiles”, and choose NVIDIA (Performance Mode)
6. Reboot the machine
7. Profit!

NVidia native driver settings
It looks like this it not limited to Ubuntu or 22.04. Hybrid graphics and the driver is buggy. When an external monitor is connected, it kills Xorg and hangs the machine. Since this means that the graphics chip consumes more energy, it would be not ideal for laptop use but at home and using this as workstation, this setting gets around the bug. I am writing this on very this laptop with an external monitor.

Waking up Ubuntu with USB keyboard

The new machine – Ubuntu 20.04LTS / Ryzen 3700x / Asus TUF GAMING B450M-PLUS, is working well.
Minor glitch is that it doesn’t want to wake up from keyboard.

# grep . /sys/bus/usb/devices/*/power/wakeup
/sys/bus/usb/devices/1-10/power/wakeup:disabled
/sys/bus/usb/devices/1-7.1/power/wakeup:enabled
/sys/bus/usb/devices/1-7.2.3.1/power/wakeup:enabled
/sys/bus/usb/devices/1-7.2.3.2.3/power/wakeup:enabled
/sys/bus/usb/devices/1-7.2.3.2/power/wakeup:disabled
/sys/bus/usb/devices/1-7.2.3.4.4/power/wakeup:enabled
/sys/bus/usb/devices/1-7.2.3.4/power/wakeup:disabled
/sys/bus/usb/devices/1-7.2.3/power/wakeup:disabled
/sys/bus/usb/devices/1-7.2/power/wakeup:disabled
/sys/bus/usb/devices/1-7/power/wakeup:disabled
/sys/bus/usb/devices/1-9/power/wakeup:disabled
/sys/bus/usb/devices/3-1/power/wakeup:enabled
/sys/bus/usb/devices/usb1/power/wakeup:disabled
/sys/bus/usb/devices/usb2/power/wakeup:disabled
/sys/bus/usb/devices/usb3/power/wakeup:disabled
/sys/bus/usb/devices/usb4/power/wakeup:disabled

I am guessing that /sys/bus/usb/devices/usb[1-4] are the root hub. Ones enabled is prob. keyboard and mouse. (For testing I plugged in 2nd set of keyboard mouse.) It might even wake up from bluetooth. (Again, I am guessing 1.7 is usb/bluetooth). So, only thing not cooperating is the root hubs.
I may be wrong, but I’m pretty sure. That means, I want to enable the root hubs to be able to relay the wakeup. (OTOH, this might be wrong, and the machine might wake up too often.)
Anyhow, it’s time to experiment.

First, something needs to happen to the root hub so the wakeup state becomes enabled. Here is my /usr/local/bin/enable-usb-roothub-wakeup.

#!/bin/sh

for roothub_wakeup in /sys/bus/usb/devices/usb*/power/wakeup ; do
  echo 'enabled' > $roothub_wakeup
done

chmod +x /usr/local/bin/enable-usb-roothub-wakeup
to make it executable.

Second, you need to run this thing at start up. You need a systemd’s unit file.
Here is my /etc/systemd/system/usb-wakeup.service

[Unit]
Description=Configure USB wake up for root hub

[Service]
Type=oneshot
ExecStart=/usr/local/bin/enable-usb-roothub-wakeup

[Install]
WantedBy=basic.target

Once you create the file,
systemctl daemon-reload to load the unit file, systemctl enable usb-wakeup so this would run at start up. Also, you could do systemctl start usb-wakeup.

I am hoping this fixes up the usb wakeup. I’ll update once the experiment’s result comes back.